


When you’re tackling basement and foundation repair work, a few key tools can make all the difference. We’re not just talking about hydraulic jacks and steel I-beams, but also tools like concrete mixers, sump pumps, and specialized drill bits for cutting through tough masonry. However, do you know exactly how these tools function and why they’re crucial for your repair work? In our upcoming discussion, we’ll explore these essential tools and others, offering you a deeper understanding of their roles in basement and foundation repair. Stick with us, there’s plenty to learn.
Key Takeaways
- Hydraulic jacks, steel I-Beams, and foundation piers are crucial for lifting and providing structural support during basement and foundation repairs.
- Concrete mixers and concrete crack sealants are essential for concrete preparation, mixing, and repair.
- Sump pumps play a vital role in managing water and preventing water damage in basements.
- Hammer drills and masonry saws are critical tools for heavy-duty tasks such as concrete and masonry cutting and drilling.
- Regular maintenance of masonry saws and effective usage of mortar sprayers are necessary for ensuring the longevity and effectiveness of these tools.
Hydraulic Jacks: Lifting Made Easy
When it comes to basement and foundation repairs, hydraulic jacks are your best friend. They’re not just any tool; they’re your ultimate lifting solution. With the power of hydraulic lift, they can effortlessly raise heavy loads, making those daunting repair tasks a whole lot easier.
Think of hydraulic jacks as the brawny sidekick you didn’t know you needed. They come with a significant load capacity, meaning they can handle the weight of your hefty foundation with ease.
And don’t worry if you’re dealing with a particularly stubborn basement; they’ve got enough muscle to tackle that too.
But it’s not all about brute strength. Hydraulic jacks are also about precision. They allow you to control the lift accurately, ensuring your foundation is level and stable.
It’s like having a trusty co-pilot, guiding your repairs to a smooth landing.
Concrete Mixers: The Foundation
Virtually every foundation repair task requires a good concrete mixer. This steadfast tool is crucial for combining all the individual components that make up the concrete types used in your project. Don’t underestimate its significance; it’s the backbone of any foundation job.
Choosing the right mixer is as important as the concrete itself. You’ve got a range of mixer sizes to pick from, and the one you need depends on the scale of your project. Smaller, portable mixers are perfect for minor repairs, while larger, professional-grade ones are necessary for more extensive renovations.
Remember, concrete isn’t a one-size-fits-all solution. Different concrete types are better suited to different tasks, and your mixer must be able to handle them all. For example, you may need a stronger, more durable concrete for a foundation that’s going to bear a substantial load. On the other hand, a lighter, more flexible concrete might be ideal if you’re dealing with soil movement or drainage issues.
In short, the concrete mixer is your steadfast ally in any basement or foundation repair. Choose wisely, and it’ll ensure your concrete is mixed to perfection, laying the foundation for a successful project.
Sump Pumps: Water Evacuation Tools
If you’ve ever found yourself knee-deep in unwanted water in your basement, you’ll appreciate the true worth of a sump pump. These powerful tools are heroes in the home repair world, working tirelessly to keep your basement dry and damage-free.
There are various sump pump types to suit your individual needs. Submersible pumps are designed to function underwater, safely tucked away in a sump pit. Pedestal pumps, on the other hand, sit above the water level, making maintenance a breeze. Backup pumps kick in during power outages, ensuring your basement stays dry no matter what.
Sump pump installation requires some finesse. You’ll need to dig a pit, install the pump, and create a discharge line. It’s important to place the sump pump where it can do the most good – usually the lowest point in the basement.
Don’t forget about local building codes, either. They’ll dictate where and how you can discharge the water.
Hammer Drills: For Tough Surfaces
When dealing with tough surfaces during your basement and foundation repairs, you’ll need a tool that’s up to the task: the hammer drill.
Let’s explore its key features, learn how to use it safely, and understand why it’s such an efficient tool in foundation repair.
You’re about to see how this powerful tool can make your repair work significantly easier.
Hammer Drills: Key Features
Piercing through tough surfaces like concrete and masonry, hammer drills emerge as an indispensable tool in foundation and basement repair work.
They’re designed for heavy-duty tasks, making them a must-have for contractors and DIY enthusiasts alike.
Let’s delve into some key features of hammer drills.
First off, you’ll encounter various hammer drill types in the market. They range from corded, cordless, to rotary hammer drills.
Each type offers unique advantages, so you’ll need to choose depending on your specific needs.
When it comes to hammer drill brands, you’re spoiled for choice. Brands like DeWalt, Makita, and Bosch have built a reputation for their reliable and durable tools.
Now, let’s highlight four key features that set these tools apart:
- A dual-mode selector switch – allows you to switch between drilling and hammer drilling.
- Variable speed trigger – lets you control drilling speed.
- Ergonomic design – provides comfort and ease of use.
- Depth rod – ensures precise drilling depth.
Understanding these features will help you when selecting the most suitable hammer drill for your tasks.
Using Hammer Drills Safely
Even the toughest surfaces are no match for a reliable hammer drill. But remember, power doesn’t mean you should skimp on safety. Hammer drill safety is crucial to prevent accidents and ensure your project’s success.
First, never forget your personal protective equipment (PPE). Safety glasses, sturdy gloves, and a dust mask should be your best friends when operating a hammer drill. They’ll protect you from flying debris and dust that can cause harm.
Next, inspect your drill and drill bit types before starting. Ensure that they’re in good condition and suitable for the material you’re working on. Using the wrong bit can lead to damage, not just to your work but also to the drill itself.
Always secure your materials properly before drilling to avoid slips that could result in injuries.
Efficiency in Foundation Repair
Having learned about the safety measures in using hammer drills, let’s explore their significance in foundation repair.
Hammer drills are indispensable tools in the foundation repair process, especially during foundation inspections and repair planning. Their efficiency lies in their power to penetrate tough surfaces, making them ideal for dealing with the often hard and unyielding materials found in basements and foundations.
Here’s how hammer drills contribute to the efficiency of foundation repair:
- Foundation Inspections: Hammer drills help identify potential issues by easily drilling into hard surfaces, allowing for thorough inspections.
- Repair Planning: Their capacity to drill through most materials aids in creating accurate repair plans.
- Implementation: Once the plan is set, hammer drills assist in carrying out the repairs, swiftly handling any hard surfaces encountered.
- Time and Effort Saving: With their power and speed, hammer drills save time and reduce physical strain, enhancing overall efficiency.
Masonry Saws: Precision Cutting
Now let’s talk about masonry saws and their role in precision cutting.
You’ll learn about different types of saws and their specific uses in basement and foundation repairs.
We’ll also touch on how to maintain these saws to ensure their longevity and efficiency.
Saw Types and Uses
When dealing with foundation and basement repairs, masonry saws are the go-to tools for precision cutting.
These saws come in various types, each with its unique purpose and set of safety and maintenance rules.
You’ve got hand saws, perfect for small-scale repairs and tight spaces.
Then there are the circular saws, ideal for cutting large slabs of materials with ease.
If you’re dealing with heavy-duty cutting needs, the chop saw is your best bet.
And let’s not forget the chainsaw, which is great for handling large blocks and stones.
Here’s a simple rundown of these saw types:
- Hand saws: Small, manageable, and precise
- Circular saws: Excellent for large, straight cuts
- Chop saws: Heavy-duty and powerful
- Chainsaws: Ideal for large blocks and stones
Maintaining Masonry Saws
Let’s cut to the chase: maintaining your masonry saws is key to their longevity and performance. Regular maintenance ensures consistent precision cutting, crucial for all your basement and foundation repair work.
Understanding masonry maintenance techniques is a must. Start by cleaning your saw after every use. This involves removing dust and debris from the blade and the handle.
Also, check for rust on the blade. If present, use a rust remover to clean it off and then apply a rust protector. This simple routine prevents damage and keeps your saw functioning optimally.
Saw blade selection is another vital aspect of masonry saw maintenance. The right blade not only impacts the quality of your cuts but also the lifespan of your saw.
Always match the blade to the type of material you’re cutting. For instance, use a diamond blade for cutting hard, abrasive materials like brick or concrete.
Mortar Sprayer: Ensuring Even Coverage
Having a mortar sprayer in your repertoire of basement and foundation repair tools can greatly enhance your repair work. This tool is essential for applying mortar evenly and efficiently, making your job smoother and faster while ensuring a high-quality finish.
Now, let’s dive into mortar application techniques and sprayer maintenance tips.
Firstly, mastering how to use a mortar sprayer effectively is crucial. Here are a few tips:
- Always ensure that the mortar mix is of the right consistency. Too thick, and it won’t spray properly; too thin, and it mightn’t stick to the surface.
- Keep the sprayer at a consistent distance from the surface for an even application.
- Apply in a controlled, steady manner to prevent over-spraying or under-spraying.
- Clean the sprayer thoroughly after each use to prevent clogging.
Maintaining your mortar sprayer is just as important as using it correctly. Regular cleaning, proper storage, and timely replacement of worn-out parts will ensure it stays in top condition.
Concrete Crack Sealant: Preventing Leaks
While a mortar sprayer is your go-to tool for applying mortar evenly, a concrete crack sealant is what you need to prevent leaks in your basement and foundation. This handy tool is designed to fill and seal cracks in concrete, offering a waterproof barrier that keeps water from seeping into your home.
Your first step should be crack monitoring. Watch for any signs of cracking in the concrete. This is a crucial component of basement and foundation repair work. You can’t fix a problem if you don’t know it’s there, right?
Next comes the sealant application. Carefully apply the concrete crack sealant into each crack ensuring it fills the entire space. It’s not just about slapping the sealant on, you’ve got to make sure it completely fills the crack to create an effective water barrier.
Once the sealant has dried, it creates a waterproof barrier that prevents water from getting in. It’s a simple, yet effective tool in your arsenal for maintaining the health of your basement and foundation.
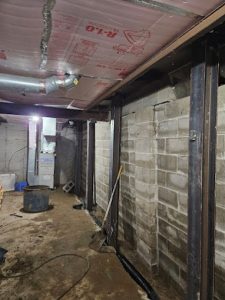
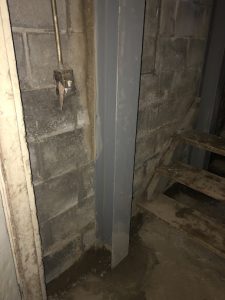
Steel I-Beams: Structural Support
In the realm of structural support, steel I-beams are a powerhouse. You’ll find them essential in basement and foundation repair work, thanks to their distinctive I beam design that makes them ideal for bearing heavy loads.
I beam installation is straightforward, but it’s crucial to get the sizing right. You don’t want an I beam that’s too small for the job, or you’re compromising safety and risking structural failure.
Consider the following when using steel I-beams:
- I beam materials: Typically, you’ll find them made from high-strength, low-alloy (HSLA) steel for optimal durability and load-bearing capacity.
- I beam costs: While the initial outlay may be higher, they’re a cost-effective solution in the long run due to their longevity and minimal maintenance needs.
- I beam maintenance: Regular inspections ensure the beams remain in top condition, protecting your investment.
- I beam safety: Always follow safety guidelines during installation to avoid accidents and ensure the structure’s stability.
Soil Stabilizer: Ground Reinforcement
Soil stabilization is your ace in the hole when it comes to ground reinforcement. It’s an invaluable tool in the world of basement and foundation repair, ensuring that the ground beneath your feet remains firm and solid.
The process involves various soil compaction techniques, which are designed to increase the density of the soil. This not only improves the soil’s strength and stability but also reduces its permeability, making it less susceptible to erosion and water damage.
It’s a cost-effective method that can significantly extend the lifespan of your foundation.
However, soil compaction isn’t the only ground reinforcement method used. There’s also the application of soil stabilizers, which are typically chemical agents. They work by altering the soil’s physical properties, binding the soil particles together to create a more stable and durable surface.
Foundation Piers: Deep Repair Solution
Beyond soil stabilization, there’s another potent tool you should have on your radar: foundation piers. These serve as a deep repair solution for your foundation problems, providing long-term stability.
Before jumping into pier installation, a thorough foundation inspection is necessary. You need to understand the extent of the damage and the type of soil you’re dealing with. This will help you decide on the right type of pier for your situation.
Foundation piers come in various forms, and each has its unique application and benefits. Here’s a rundown:
- Push Piers: These are driven into the ground until they reach stable soil or bedrock. They’re great for lifting a sinking foundation back to its original position.
- Helical Piers: These are screwed into the ground, making them ideal for lighter structures or preemptive installations.
- Slab Piers: These are used to lift and stabilize concrete slabs that have sunk.
- Porch Piers: These are designed to support and stabilize sinking porches or steps.
With the right foundation piers, you’ll not only fix existing problems, but also prevent future ones. It’s a reliable solution that puts your foundation worries to rest.
Frequently Asked Questions
What Safety Measures Should Be Taken During Basement and Foundation Repair Work?
When doing basement and foundation repair work, you should always prioritize safety.
Conduct a thorough hazard assessment before starting. Identify potential risks such as falling debris, sharp objects, or electrical hazards.
Always wear personal protective equipment like hard hats, safety goggles, gloves, and sturdy footwear.
It’s not just about the tools you’re using, it’s about taking the necessary precautions to prevent accidents.
How Long Does the Average Basement or Foundation Repair Typically Take?
When you’re planning a basement or foundation repair project, timelines can vary.
It really depends on the extent of the damage. Minor fixes might take a few days, but major repairs can stretch into weeks.
It’s crucial to plan your project carefully, allowing ample time for unexpected issues.
Remember, it’s not a race. You’ll want the job done right, not rushed.
Patience will ensure a sturdy, long-lasting repair.
What Signs Should Prompt a Homeowner to Consider Basement or Foundation Repair?
If you’re spotting cracks on your walls or floors, it’s a clear sign you need basement or foundation repair.
Cracks detection isn’t always straightforward, so keep an eye out.
Also, if there’s an increase in moisture levels in your basement, it’s time to consider repair.
Moisture assessment is key in maintaining the integrity of your foundation.
Don’t neglect these signs, as they could lead to more serious structural issues down the line.
How Does Weather or Climate Affect the Use of These Tools and the Repair Process?
Weather effects significantly impact your use of repair tools.
In cold climates, you’ll find some materials become brittle and harder to work with.
Rainy weather can make the ground too soft for certain repairs.
Climate considerations also affect the drying and curing time of substances like concrete.
What Are the Common Causes of Basement and Foundation Damage?
Common causes of basement and foundation damage can be numerous.
You’ll often find issues like cracking walls – a clear sign of structural stress.
Then there’s moisture intrusion, which can cause a host of problems from mold to weakening of the material.
Other factors could be poor soil conditions, improper drainage, or even tree roots growing too close to the foundation.
It’s crucial to address these issues promptly to prevent further damage.
So, you’ve got your hydraulic jacks, concrete mixers, and sump pumps on hand. You’re ready to tackle tough surfaces with your hammer drill and masonry saw. Don’t forget your concrete crack sealant, steel I-beams, soil stabilizer, and foundation piers. These are the top tools for any basement or foundation repair job. Keep them well-maintained and they’ll keep your basement standing strong. Remember, a well-equipped toolbox is the first step to a successful repair.

Giulio and Jennifer Bevilacqua are the dedicated and passionate owners of Highlander Waterproofing, a trusted name in basement waterproofing and foundation repair. With a commitment to protecting homes and ensuring the safety and well-being of families, Giulio and Jennifer have built Highlander Waterproofing into a premier service provider in the region. Their hands-on approach, combined with years of industry expertise, has helped them earn a stellar reputation for delivering reliable and effective waterproofing solutions.
The Bevilacquas pride themselves on offering personalized service, using proven techniques, and employing a team of highly trained professionals who share their dedication to quality workmanship. As a family-owned and operated business, Giulio and Jennifer emphasize integrity, transparency, and a genuine concern for their clients’ needs. They believe in building lasting relationships with their customers by ensuring each project is completed to the highest standards. Highlander Waterproofing continues to thrive under their leadership, offering innovative solutions and exceptional customer service that homeowners can depend on.