


As winter approaches, you’re likely focusing on keeping warm and cozy inside your home. But have you considered the damage freezing temperatures can inflict on your house’s plumbing? Frozen pipes and leaks aren’t just inconveniences, they can lead to significant, costly repairs if not addressed promptly. So, how do you winterize your plumbing to prevent these issues? Insulating pipes, disconnecting outdoor hoses, and monitoring for early signs of freezing are just the tip of the iceberg. But what about the rest? Stay tuned to find out more.
Key Takeaways
- Winterize your plumbing by disconnecting outdoor hoses, draining sprinkler systems, and maintaining indoor temperatures above 55°F.
- Insulate pipes using efficient materials like fiberglass, polyethylene foam, or aerogel to prevent freezing and lower energy costs.
- Regularly inspect high-risk areas like exterior walls, unheated spaces, and outdoor faucets for potential freezing issues.
- If pipes freeze, gently thaw them using hairdryers or heaters, working from the faucet end towards the frozen section.
- Seek professional help from local plumbing companies or online platforms for quick and effective solutions to winter-related plumbing problems.
Understanding the Risk of Frozen Pipes

While you may not consider it, the risk of frozen pipes is a serious concern during winter. When temperatures plummet, the water inside your pipes can freeze. This frozen blockage then puts immense pressure on your plumbing system, leading to possible pipe bursts.
You may think that a busted pipe just means a temporary loss of water, but it’s more severe than that. The water from a burst pipe can cause significant property damage. We’re talking ruined carpets, stained walls, and damaged furniture. It’s not just a mess to clean up; it’s costly.
If you’re lucky, you’ll spot the signs early. A decrease in water pressure, visible frost on your pipes, or even strange smells coming from your faucets can all be warning signs.
But don’t rely on luck. Prevention is key. Knowing the risk, you’re now equipped to take action. Keep an eye on your plumbing system, especially during colder months.
It’s always better to be proactive than reactive. Remember, frozen pipes are more than an inconvenience; they’re a potential disaster waiting to happen. Don’t underestimate the damage they can cause.
Essential Winterizing Plumbing Tips
Now that you know the risk of frozen pipes, let’s talk about how to prevent them. Winterizing your plumbing is essential. It’s not just about insulation, it’s about preparation and maintenance.
First, disconnect any hoses outside. Water left in hoses can freeze and cause the connecting faucet to freeze as well. In addition, it’s a good idea to drain your sprinkler system. Any water left in the system can freeze, expand, and damage your pipes.
Next, you’ve got to drain your water heater. Sediment can build up in the bottom of the tank and can cause it to work harder, making it more likely to freeze.
Don’t forget to check your sump pump pit. If it freezes, it can cause real havoc.
Lastly, keep an eye on your indoor temperature. Don’t let it drop below 55°F, even when you’re not home. A colder house can mean frozen pipes.
Insulating Pipes: A Step-by-Step Guide
Now, let’s talk about insulating your pipes for the winter.
First, we’ll guide you in picking the right insulation for your pipes.
Then, we’re going to walk you through the installation process, step-by-step.
Choosing the Right Insulation
Ever thought about the type of insulation best suited for your pipes during the frosty winter months?
It’s a vital decision that can have lasting effects on your home’s efficiency and durability.
Insulation types differ by material, thickness, and thermal conductivity. Choosing the right one can be a bit overwhelming.
But don’t worry, we’ve got you sorted.
- Fiberglass: This old-school insulation type is still popular due to its affordability and versatility.
It’s great for insulating both hot and cold pipes, but be aware of its susceptibility to moisture.
- Polyethylene Foam: This is an excellent choice for those seeking an easy-to-install, moisture-resistant option.
It’s ideal for cold pipes as it effectively prevents condensation.
- Aerogel: If budget isn’t a concern, consider aerogel.
It’s thin, high-performing, and moisture-resistant, making it a high-quality choice for both hot and cold pipes.
Insulation Installation Process
Ready to tackle your home’s pipe insulation? It’s simpler than you’d think! With the right materials in hand and a few easy-to-follow steps, you’ll be able to effectively insulate your pipes before winter hits.
Here’s a step-by-step guide to help you through the process:
| Step | Details | Materials Needed |
|---|---|---|
| 1 | Purchase insulation | Pre-slit pipe foam |
| 2 | Measure and cut | Tape measure, utility knife |
| 3 | Install the foam | Duct tape |
| 4 | Secure with tape | Duct tape |
| 5 | Check properly | None |
Start by purchasing pre-slit pipe foam for your pipes. Measure the length of the pipes you’re insulating, then cut the foam to fit. Slip the foam onto the pipes, ensuring they’re thoroughly covered. Secure the foam with duct tape, making sure it’s snug and secure. Finally, double-check your work, making sure there aren’t any gaps or loose sections.
Don’t forget, insulation not only prevents frozen pipes but also reduces heat loss. So, you’ll enjoy a warmer home and lower energy bills. Now, get insulating and prepare your home for winter!
Spotting Potential Problem Areas
Before winter strikes, it’s crucial to identify the potential problem areas in your home that might be susceptible to the harsh weather conditions.
Your property is filled with hidden spots that, if overlooked, could cause serious problems when the temperature drops.
Here are three key areas you should pay special attention to:
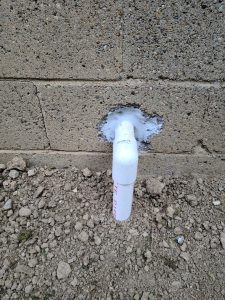
- Exterior Walls and Pipes: Any pipes along your exterior walls are highly susceptible to freezing. If they’re not properly insulated, they might freeze and potentially burst, resulting in costly repairs.
- Unheated Spaces: Areas like your garage, attic, or basement are often unheated and can become very cold in winter. Any pipes in these areas need extra attention since they’re more likely to freeze.
- Outdoor Faucets: Your outdoor faucets are directly exposed to the cold. If you leave garden hoses attached or fail to drain the faucets, water might freeze inside and cause them to crack.
Handling Frozen Pipe Situations
In the heart of winter, discovering a frozen pipe in your home can be a nightmare scenario. You’re not alone though and there are steps you can take to tackle this issue head-on.
First, you’ve got to identify the problem. If a faucet isn’t running or your toilet won’t refill after a flush, there’s a good chance you’ve got a frozen pipe on your hands. Don’t panic. It’s essential to act promptly but calmly.
Locate the frozen area, which can often be identified by frost on the outside of the pipe or slight bulging. Once you’ve found it, gently thaw it using a hairdryer, heat lamp, or portable space heater. Don’t use open flames as they can cause more harm than good.
Gradually apply heat, moving from the faucet end towards the frozen area. This allows water to flow out as it thaws. Additionally, leave the faucet open to relieve pressure and facilitate the thawing process.
Lastly, check other pipes in your home. If one pipe’s frozen, others might be too.
Resources for Professional Plumbing Help
Occasionally, despite your best efforts at home winterization, you may find yourself facing a plumbing issue too complicated to handle on your own.
In such cases, it’s crucial to know where to turn for professional help. It’s important you don’t let a small problem turn into a costly disaster due to a lack of knowledge or resources.
- Local Plumbing Companies: Your first port of call should be local plumbing companies. They’re typically well-versed in dealing with a variety of plumbing issues, including those specific to cold winters.
The advantage of local companies is their quick response time and familiarity with the area’s common plumbing problems.
- Online Platforms: Websites like Angie’s List, HomeAdvisor, and Thumbtack offer a platform where you can find reviews and ratings of local plumbers.
You can compare prices, check availability, and even schedule appointments online.
- Hardware Stores: Don’t underestimate the knowledge of staff at your local hardware store.
They often have connections with local plumbers and can recommend someone based on your specific needs.
Don’t let winter wreak havoc on your plumbing. By disconnecting outdoor hoses, draining systems, and insulating vulnerable pipes, you’ll prevent frozen pipes and leaks. Stay vigilant for early warning signs, like low water pressure or frost. If you spot trouble, act fast to avoid costly damage. And remember, professional help is always available if things get tricky. With these steps, you’re on your way to a safe, leak-free winter season.

Giulio and Jennifer Bevilacqua are the dedicated and passionate owners of Highlander Waterproofing, a trusted name in basement waterproofing and foundation repair. With a commitment to protecting homes and ensuring the safety and well-being of families, Giulio and Jennifer have built Highlander Waterproofing into a premier service provider in the region. Their hands-on approach, combined with years of industry expertise, has helped them earn a stellar reputation for delivering reliable and effective waterproofing solutions.
The Bevilacquas pride themselves on offering personalized service, using proven techniques, and employing a team of highly trained professionals who share their dedication to quality workmanship. As a family-owned and operated business, Giulio and Jennifer emphasize integrity, transparency, and a genuine concern for their clients’ needs. They believe in building lasting relationships with their customers by ensuring each project is completed to the highest standards. Highlander Waterproofing continues to thrive under their leadership, offering innovative solutions and exceptional customer service that homeowners can depend on.