


You’re probably aware of how essential it is to seal your basement walls from the inside, but do you know the best practices to do it effectively? It’s not just about slapping on some sealant and calling it a day. Choosing the right sealant, proper application, and regular maintenance can make all the difference in preventing moisture issues. But what about the common mistakes that can sabotage your efforts? Stay tuned as we unravel the details, ensuring your basement remains dry and damage-free.
Key Takeaways
- Begin by inspecting the basement walls for damage and moisture issues, addressing them immediately to prevent structural problems.
- Prepare the area by clearing furniture, cleaning the walls with warm water and detergent, and ensuring complete drying before sealing.
- Choose the appropriate sealant material based on the type of your basement wall, considering factors like durability, waterproofing ability, and cost.
- Avoid common mistakes such as overlooking damp patches, using inadequate sealing materials, and failing to address condensation.
- Regular maintenance is necessary post-sealing, including visual inspections for discoloration or peeling sealant and reapplication as per manufacturer’s guidelines.
Understanding Basement Moisture Issues
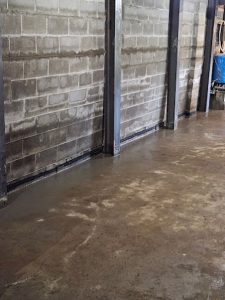
You may find your basement walls damp or wet due to moisture issues. This isn’t something you should ignore or treat lightly. Moisture problems in your basement can be a sign of serious issues that require immediate attention.
When your basement walls are wet, it’s typically due to water seeping in from the outside. This can happen because of heavy rain, poor drainage systems, or even a high water table. If you’re noticing water on your walls, it’s important to identify the source of the moisture quickly.
Condensation is another common cause of basement moisture. It occurs when warm, moist air comes into contact with the cool basement walls and floor. It’s like when your cold glass of lemonade “sweats” on a hot summer day.
 Importance of Inspecting Your Basement
Without a doubt, inspecting your basement is essential in dealing with moisture issues. You can’t simply slap on a sealant and expect it to solve all your problems. To effectively manage and prevent moisture complications, you need to thoroughly assess the state of your basement.
Start by examining the walls for signs of water damage. Look for discoloration, cracking, or peeling paint. Don’t overlook the seemingly minor issues; they’re often a sign of a bigger problem lurking beneath the surface.
Next, check the floor and pay close attention to the corners and edges, where moisture frequently accumulates. If you see damp spots or mold growth, it’s a clear sign that water is infiltrating your basement.
Inspect the ceiling too. Dark spots or sagging materials might indicate a leak from above.
And don’t forget about windows and doors; they can be a significant source of water intrusion.
Lastly, sniff around. A musty odor often signals hidden moisture problems. It’s not about being paranoid; it’s about being proactive.
Choosing the Right Sealant Material
Maneuvering the wide array of sealant materials can seem intimidating. Don’t worry, you’re not alone. It’s crucial to choose a sealant that best fits your specific needs. There are three main types of sealants you’ll encounter: concrete sealers, silicate sealants, and acrylic sealants.
| Sealant Type | Pros | Cons |
|---|---|---|
| Concrete Sealers | Durable, Waterproof | Expensive, Difficult to Apply |
| Silicate Sealants | Easy to Apply, Clear Finish | Not Ideal for Walls with Paint |
| Acrylic Sealants | Affordable, Versatile | Short Lifespan, Not as Durable |
Concrete sealers are your go-to for a durable, waterproof finish. However, they’re on the expensive side and can be tricky to apply. Silicate sealants are user-friendly with a clear finish, but they’re not ideal for walls with existing paint. Acrylic sealants are affordable and versatile, but they don’t have the lifespan or durability of the other types.
In the end, it’s about weighing up the pros and cons to decide what’s best for your situation. Remember, the right sealant can make all the difference in sealing your basement walls from the inside.
Preparing Your Basement Walls
Before diving into the sealing process, an essential step is ensuring your basement walls are properly prepared. It’s not a task to be taken lightly – the success of your project depends on it.
Firstly, clear the area. Remove any furniture or items attached to your walls to allow full access. You don’t want to miss a spot. Make sure the room is well-ventilated. Safety first, remember.
Next, inspect the walls. Look out for cracks, holes, or any signs of damage. You’ll have to fix these before sealing. If there’s loose or peeling paint, you’ll need to scrape it off. Be thorough – any paint left behind could prevent the sealant from adhering properly.
Lastly, clean the walls. Get rid of any dust, dirt, or residues that could compromise the sealant’s effectiveness. You can use a simple mixture of warm water and mild detergent. Rinse thoroughly and let the walls dry completely.
Once the walls are clean, smooth, and dry, you’re ready to move to the next step. But remember, preparation is key. Do it right, and you’ll set yourself up for success.
Step-by-Step Sealing Technique
Now that your basement walls are ready, let’s plunge into the actual sealing process. Start by applying a waterproof primer to your walls. This helps the sealant adhere to the wall better and provides an extra layer of protection against moisture.
Use a paint roller or brush to apply the primer evenly across the wall surface. Make sure you cover every nook and cranny, especially areas prone to water leaks. Allow the primer to completely dry before you proceed.
Next, apply the first layer of sealant. Remember to use a waterproof sealant specifically designed for basement walls. Spread the sealant evenly using a brush or roller. Don’t rush this step; take your time to guarantee you’ve covered all areas of the wall.
Once the first layer dries, apply a second coat for added protection. Depending on the sealant used, you may need to wait a few hours or even a day for each layer to dry.
Caring for Your Sealed Walls
Now that you’ve sealed your basement walls, it’s important to know how to care for them.
Routine maintenance is key, but knowing how to spot potential damage early on is equally essential.
We’re also going to talk about how to prevent moisture from becoming a problem in the first place.
Routine Sealed Wall Maintenance
Maintaining your sealed basement walls is a task that shouldn’t be overlooked. Regular upkeep not only extends the lifespan of the sealant but also keeps your basement in top shape.
Start with a simple visual inspection. Look for any changes in the appearance of the walls, such as discoloration or peeling sealant. Take note, but don’t panic. These changes aren’t necessarily signs of damage; they could just be due to regular wear and tear.
Next, clean the walls lightly with a damp cloth or a soft-bristled brush. Avoid using harsh cleaning agents as they can damage the sealant. It’s important to remove dust and grime that could potentially degrade the sealant over time.
Ensure the area remains dry. Use a dehumidifier if necessary to maintain optimum humidity levels. Too much moisture can compromise the sealant’s integrity.
Finally, reapply sealant as needed. Consult the manufacturer’s instructions for specific time frames. Typically, sealants need reapplication every few years.
With regular maintenance, your sealed basement walls will continue to serve their purpose effectively.
Identifying Potential Damage
Keep a vigilant eye on your sealed basement walls for signs of potential damage. This isn’t just a one-time thing, it’s an ongoing task. Over time, even the most expertly sealed walls can develop problems. Early detection is key, it’ll save you a lot of time, money, and headache down the line.
Look for changes in the wall’s color. If you see dark patches or streaks, it’s likely the sealant’s failing. Also, pay attention to the texture. If the surface becomes rough or starts peeling, it’s another sign of trouble.
Don’t forget to touch the walls too. If they’re unusually cold or damp, there’s likely a problem with the sealant.
Cracks are another obvious sign of potential damage. Even small, hairline cracks can lead to bigger issues if not addressed promptly.
Finally, watch out for mold and mildew. If you spot any on your basement walls, it’s a clear indication of moisture seeping through, compromising the sealant.
Always consult a professional if you’re unsure. They can help identify issues you might’ve missed and provide advice on what to do next.
Prevention of Wall Moisture
To guarantee your sealed basement walls remain moisture-free, regular care and preventive measures are essential. You should frequently inspect your walls for any signs of moisture penetration.
Don’t ignore even the smallest signs of dampness. Leaks can occur due to changes in the surroundings, so it’s best to tackle them early before they escalate into a more significant issue.
You can use a dehumidifier to control the humidity level in your basement. High humidity levels can lead to condensation, which can cause moisture problems on your sealed walls.
You should also verify proper ventilation in your basement. It’ll help to keep the air dry and prevent the buildup of moisture. Remember, prevention is always better than cure.
Lastly, don’t forget about your gutters and downspouts. They play a vital role in directing water away from your home. So, keep them clean and free from blockages.
If water is allowed to pool near your basement, it could potentially seep into the walls, making your sealing efforts futile.
Common Mistakes to Avoid
When sealing your basement walls from the inside, it’s essential to sidestep some common pitfalls.
You can’t afford to ignore moisture problems or use inadequate sealing materials.
Let’s explore these mistakes and how you can avoid them.
 Overlooking Moisture Problems
 Overlooking Moisture Problems
Often, homeowners underestimate the significance of moisture problems when sealing basement walls from the inside. You may believe that a little moisture is harmless, but this is a misconception. Ignoring moisture problems can lead to a host of issues, including mold growth, structural damage, and a compromised seal.
You might be tempted to overlook a damp patch on the wall, thinking it’s insignificant. But remember, even a small amount of moisture can seep into the wall over time, weakening the seal and damaging the integrity of the wall. This can eventually lead to costly repairs.
Another common mistake is failing to address condensation issues. You may not think it’s a big deal, but condensation can create a moist environment that encourages mold growth. Plus, if you’re sealing your basement walls in a humid environment, the seal is more likely to fail.
Avoid these pitfalls by taking moisture problems seriously. Make sure to thoroughly dry your basement before sealing, and consider using a dehumidifier to help control moisture levels.
Inadequate Sealing Materials
Choosing the wrong sealing materials can lead to disappointing results in your basement waterproofing project. It’s not just about slapping on any old sealant and hoping for the best. You’ve got to be thoughtful about it.
Inferior or inadequate sealing materials won’t stand up to the test of time. They may appear to work initially, but they’ll likely fail under the constant pressure of water seepage. This can result in leaks, dampness, and even structural damage over time. It’s not a risk you want to take.
So, avoid cheap, low-quality sealants. They’re not a bargain if you end up having to redo the entire job a few years down the line. Instead, opt for a high-quality, waterproof sealant specifically designed for basement applications. These are designed to withstand the harsh conditions of a basement environment and will provide long-lasting protection.
Also, don’t forget to reflect on the type of wall you’re sealing. Different materials may require different types of sealants. You wouldn’t use the same sealant for concrete as you’d for brick, right? Doing your homework on this can save you a lot of heartache later on.
Benefits of Professional Basement Sealing
With professional basement sealing, you’re investing in a multitude of benefits.
First and foremost, you’re securing a barrier against moisture. This isn’t just about preventing puddles; it’s about stopping mold and mildew growth, which can compromise your health and home.
You’ll also gain energy efficiency. A well-sealed basement helps maintain an even temperature throughout your home, reducing the strain on your HVAC system. You’ll notice a decrease in your energy bills as a result.
When it’s time to sell your house, a professionally sealed basement adds value to your property. It reassures potential buyers that they won’t have to deal with water damage or related issues.
Don’t forget peace of mind. You’ll sleep better knowing you’ve done everything you can to protect your home and family. You’re not just sealing a basement; you’re sealing out problems and worries.
A DIY job might seem cheaper, but remember, professionals have the right tools, materials, and knowledge to do the job correctly.
Mistakes can be costly, and you might end up hiring a professional anyway to fix them. So why not skip the stress and go straight for the best solution? You’ll find it’s worth every penny.
So, sealing your basement walls from the inside isn’t just a one-time chore. It’s about understanding moisture issues, choosing the right sealant, and maintaining your walls. But, remember to avoid common mistakes and consider professional help if needed. Ultimately, the effort you put in now will pay off by keeping your basement dry and damage-free. Don’t underestimate the significance of a well-sealed basement – it’s an essential part of a healthy home.

Giulio and Jennifer Bevilacqua are the dedicated and passionate owners of Highlander Waterproofing, a trusted name in basement waterproofing and foundation repair. With a commitment to protecting homes and ensuring the safety and well-being of families, Giulio and Jennifer have built Highlander Waterproofing into a premier service provider in the region. Their hands-on approach, combined with years of industry expertise, has helped them earn a stellar reputation for delivering reliable and effective waterproofing solutions.
The Bevilacquas pride themselves on offering personalized service, using proven techniques, and employing a team of highly trained professionals who share their dedication to quality workmanship. As a family-owned and operated business, Giulio and Jennifer emphasize integrity, transparency, and a genuine concern for their clients’ needs. They believe in building lasting relationships with their customers by ensuring each project is completed to the highest standards. Highlander Waterproofing continues to thrive under their leadership, offering innovative solutions and exceptional customer service that homeowners can depend on.