


Ever wondered if there’s a quick way to detect moisture sources in your home without calling a professional? The Aluminum Foil Test might be the answer you’re looking for. By attaching a piece of aluminum foil to a potential problem area and observing it for 24 hours, you can identify if the issue lies within the wall or in the room’s humidity. Understanding the results is a breeze, but it’s the implications of those results that will truly pique your interest. So, ready to uncover the hidden secrets of your living space?
Key Takeaways
- The Aluminum Foil Test is a cost-effective DIY method to detect moisture sources in homes or offices.
- The test involves securing a 12-inch square of foil to a suspect area, with all edges sealed, for at least 24 hours.
- Post-test, dry foil indicates no significant moisture, room-side condensation suggests high humidity, and wall-side condensation hints at potential leaks.
- The foil acts as a moisture barrier, helping to identify damp areas and potential sources of moisture damage.
- Early detection and management of moisture problems using this test can prevent mold, mildew, and other related issues.
Understanding the Moisture Problem
Why is understanding moisture important? Well, let’s start with the fact that moisture can pose a significant threat to both your health and your home. It’s a silent intruder that can cause multiple problems if not identified and managed correctly.
Take a moment to imagine the havoc excessive moisture can create. It can lead to the growth of mold and mildew, which not only damage your home’s structure but also pose serious health risks, especially for people with allergies or respiratory problems.
Moisture can also cause wood to rot, paint to peel, and metal to rust, compromising the integrity of your home.
Moreover, it’s not just about the visible damage. Moisture can affect the air quality inside your home, making it uncomfortable and unhealthy to live in. Higher moisture levels can also increase your energy bills as your HVAC system struggles to maintain ideal indoor conditions.
Understanding the moisture problem involves recognizing its potential hazards, identifying the signs, and knowing the ways to control it.
You’ll learn more about spotting moisture sources in the next section, but for now, appreciate the importance of dealing with moisture issues promptly and effectively.
Importance of Spotting Moisture Sources
Having a clear understanding of the moisture problem, it’s time to turn our attention to the identification of its sources.
Detecting where this dampness originates is essential. It’s not about merely wiping the water off your wall or floor; it’s about addressing the root cause.
Moisture can be sneaky. It can seep into your home from numerous sources, both internal and external. If you’re not vigilant, it can accumulate, leading to a host of issues such as mold growth, structural damage, and even health problems due to poor air quality.
You might wonder, why is it so important to pinpoint the sources of moisture?
Well, by identifying the source, you’re taking the first step towards a solution. You’re not just treating the symptoms; you’re tackling the problem head-on. It allows you to implement targeted strategies to reduce or eliminate the moisture.
What Is the Aluminum Foil Test?
In your quest to uncover the source of moisture, the aluminum foil test emerges as a simple yet effective tool.
It’s a DIY method that uses everyday household items to help you identify problematic damp areas. This test, often used by homeowners and construction experts, can pinpoint where moisture is seeping into your home or office.
Here’s how it works: you place a small patch of aluminum foil on a suspect area and monitor it over several days. Aluminum foil, due to its non-porous nature, doesn’t allow moisture to pass through. Consequently, any condensation that forms will either be on the room-facing side or the wall-side of the foil.
If you spot moisture on the room-facing side, it means that the area has high humidity – the air’s moisture is condensing on the cooler foil.
But if you notice dampness on the wall-side, you’ve got a more significant issue. It indicates that moisture is seeping through the wall itself, suggesting a problem with water intrusion.
The aluminum foil test is straightforward, cost-effective, and an efficient way to spot potential moisture issues.
It’s a reliable first step in your moisture detective work.
Gathering Your Test Materials
Now, let’s get your materials ready for the aluminum foil test.
You’ll need to gather some specific supplies to guarantee an accurate read on moisture sources.
Don’t worry, we’ll go over exactly what you need and how to prepare them for use.
Necessary Testing Supplies
You’ll need some basic supplies to run a successful moisture test with aluminum foil. It’s essential to gather all your materials beforehand to guarantee a smooth process.
Here’s a simple list of the items you’ll require:
| Item | Purpose |
|---|---|
| Aluminum foil | To serve as a moisture barrier |
| Tape | To secure the foil to the testing surface |
| Marker | To label the test area |
| Notepad | To record observations |
| Clock or timer | To keep track of the test duration |
Firstly, you’ll need aluminum foil, the most vital item. It’ll act as a moisture barrier against your testing surface. Next, you’ll need tape to secure the foil to the surface. A marker is necessary to label your test area, especially if you’re planning to test multiple locations.
A notepad will help you record your observations. Remember, it’s important to note any changes in the foil’s condition over time. Finally, a clock or timer is needed to keep track of the test duration.
In the next section, we’ll discuss how to prepare these materials for the test.
Preparing Your Materials
Having gathered all your necessary supplies, it’s time to get them ready for the moisture test.
First off, you’ll want to cut your aluminum foil into squares. The size doesn’t have to be exact, but aim for roughly 12-inch by 12-inch squares. Make sure you’ve got enough to cover the areas you’re testing, plus a few extras just in case.
Next, grab your masking tape. You’ll be using this to secure the foil squares to your walls and surfaces. It’s important to use masking tape rather than duct tape or any other sticky tape, as you don’t want to risk damaging your walls when you remove the foil later.
Finally, you’ll need a marker. This is to label your foil squares. Write directly on the foil where each square is going to be placed. This way, you’ll remember which square was in which location, and you can better track your results.
Now that your materials are ready, you’re all set to start the test. Remember to be patient and thorough. The results of this test could reveal hidden moisture sources in your home, helping you prevent potential damage in the future.
Preparing Your Space for Testing
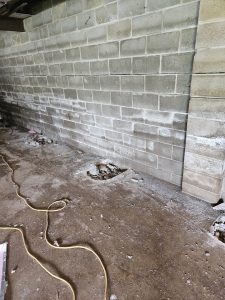
Before diving into the aluminum foil test for moisture sources, it’s essential to properly prepare your testing space. The test’s accuracy depends largely on this stage. Your space’s readiness can make the difference between a successful moisture detection and a misleading result.
First, start by clearing the area. Remove any furniture or objects that might obstruct easy access to the walls or floors you’re testing. Remember, you’re not just looking for visible signs of moisture, you’re also searching for hidden sources that might be causing unseen damage.
Next, clean the area thoroughly. Dust, dirt, and other particles can interfere with the test, leading to inaccurate results. Use a damp cloth to wipe down the surfaces. Make sure it’s dry before proceeding.
Then, identify the areas you suspect might’ve moisture. These could be spots with visible signs of dampness, paint discoloration, or mold growth. You’ll want to test these areas specifically, but don’t overlook other areas. Moisture can hide in the most unexpected places.
Step-by-Step Application of the Foil Test
Now that your space is ready, let’s get into the step-by-step application of the foil test.
You’ll be implementing the test and then, just as importantly, interpreting the results.
Don’t worry, it’s not as complicated as it might sound!
Implementing the Foil Test
If you’re suspecting a moisture issue in your home, it’s time to implement the foil test. This simple, yet effective DIY method can help you identify potential sources of unwanted moisture. Here’s how you do it:
- Find a Suspect Area: Look for places where you’ve noticed signs of dampness, mold, or mildew. This could be in the basement, attic, or even behind appliances like your fridge or washing machine.
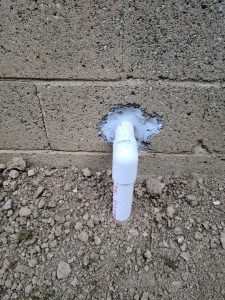
- Prepare Your Foil Square: Tear off a square of aluminum foil that’s about one foot by one foot. It’s important to guarantee it’s large enough to cover a substantial portion of the suspected area.
- Attach Foil to the Wall: Use tape to secure the foil square to the wall, making sure all edges are well-sealed. You’re creating a moisture barrier with the wall, so it’s vital to seal it completely.
- Wait: Leave the foil in place for at least 24 hours. This gives enough time for any moisture in the wall to react with the foil.
Interpreting Test Results
After waiting patiently for 24 hours, it’s time to examine your foil square. The appearance of your foil can tell you a lot about the moisture levels in your home.
Let’s interpret the results using the table below:
| Foil Appearance | Interpretation |
|---|---|
| Condensation on Room Side | High air humidity |
| Condensation on Wall Side | Moisture from the wall |
| Condensation on Both Sides | High air humidity and wall moisture |
| No Condensation | No significant moisture source |
If there’s condensation on the room side, your air is too humid. Try using a dehumidifier. Condensation on the wall side indicates moisture is seeping from the wall. This is a sign of a potential leak or dampness within the wall itself. If you notice condensation on both sides, you’re dealing with both issues. No condensation means there’s no significant moisture source, and you’re in the clear.
Interpreting the Test Results
Understanding your test results is simpler than you might think. Once you’ve conducted the aluminum foil test, you’ll have a visual representation of moisture levels in your house. The foil doesn’t lie; it mirrors what’s happening in your environment.
Here’s how you can interpret the results:
- Dry Foil: If the foil is dry on both sides, congrats! Your home is moisture-free.
- Condensation on Room Side: If there’s condensation on the room side, your home’s air is humid. You might need to contemplate a dehumidifier.
- Condensation on Wall Side: Moisture on the wall side indicates a wall leak. It’s time to call a professional for help.
- Condensation on Both Sides: If there’s moisture on both sides, you’ve got a serious problem. Your wall isn’t only leaking, but your indoor air is also too humid.
Common Moisture Sources in Homes
You might be surprised by the variety of moisture sources in your home.
From hidden plumbing leaks to pesky condensation issues, identifying these common household problems is the first step to a healthier environment.
Let’s discuss how you can manage these moisture sources effectively.
Identifying Household Moisture Problems
So many homes suffer from moisture problems, often unknowingly.
It’s an issue that can lead to both health and structural problems in your home. But how do you identify these problems? It’s not as intimidating as you might think.
The first step is to be aware of the common signs of excess moisture. This can include a musty smell, peeling or bubbling paint, or even visible mold growth.
If you notice any of these signs, it’s time to investigate further.
Here’s a simple guide to help you identify potential moisture problems:
- Condensation on windows: This is often a sign of high humidity levels in your home, especially if it’s a regular occurrence.
- Damp spots on walls or ceilings: These may indicate a leak somewhere in your home. Remember, the source of the leak may not be directly above the damp spot.
- Warped wood: If your hardwood floors, furniture, or door frames are warping, this could be a sign of excess moisture.
- Basement moisture: A damp, musty basement is a clear sign of moisture problems.
Moisture From Plumbing Leaks
Building on the signs of moisture problems in your home, let’s tackle one of the most common sources: plumbing leaks. You’d be amazed how much moisture can sneak in from a tiny pipe leak. And it’s not just moisture; leaks can lead to mold, mildew, and structural damage.
So, how do you spot them? First, check under sinks and around toilets for any pooling water, discoloration, or warped cabinetry. These are telltale signs of a slow leak.
Next, listen. Often, you’ll hear a faint dripping or rushing water sound in the quiet of the night. Don’t ignore it. That’s your home trying to tell you something’s wrong.
Using the aluminum foil test can also help. Simply attach a piece of foil to a suspicious area. If it shows signs of moisture after 24 hours, you’ve got a problem.
Plumbing leaks can be sneakily destructive, but they’re also avoidable. Regular inspection and maintenance are key. If you’re not comfortable doing it yourself, hire a plumber. Their expert eye can spot and fix potential issues before they become major disasters.
Don’t let a small leak turn into a big problem.
Managing Condensation Issues
Let’s turn our attention to another common source of moisture in homes: condensation.
You’re familiar with it, it’s the water droplets that form on windows during a cold winter’s day or on a glass of ice water during a hot summer’s afternoon.
In your home, condensation can lead to a buildup of moisture, which if left unchecked, can cause serious issues like mold growth, water damage, and poor indoor air quality.
To manage condensation issues effectively, here are four steps you can take:
- Increase Ventilation: Keep air moving in your home. Use exhaust fans in the kitchen and bathroom, and open windows when possible.
- Control Humidity: Invest in a dehumidifier to manage humidity levels, especially in damp areas like basements.
- Insulate Properly: Pay attention to proper insulation in your home. This can help prevent condensation on cold surfaces.
- Use Moisture-Resistant Materials: When renovating or building, opt for materials designed to resist moisture.
Preventive Measures Against Moisture
Shielding your home against moisture, it’s essential to understand the preventive measures that you can take. First and foremost, guarantee proper ventilation throughout your home. Regularly open windows, especially in high-humidity areas like your kitchen, bathroom, and laundry room. This aids in reducing condensation and maintaining balanced humidity levels.
Invest in a high-quality dehumidifier, an important tool for moisture control. It’s particularly useful in damp areas of your home such as your basement or garage. Keep in mind, though, that a dehumidifier isn’t a cure-all, but rather a part of a broader moisture prevention strategy.
Next, consider your home’s insulation. Good insulation not only keeps your home warm, but also helps prevent condensation by reducing the temperature difference between the inside and outside of your home. Regularly check and update your insulation as needed.
It’s also critical to regularly maintain and clean your gutters. Blocked gutters can lead to water seeping into your home, causing unnecessary moisture problems.
Lastly, don’t overlook your home’s exterior. Regularly inspect the roof, walls, and foundation for any signs of damage or leaks. Nip any potential problems in the bud before they lead to a full-blown moisture issue.
Addressing Identified Moisture Sources
Once you’ve pinpointed the sources of moisture in your home, it’s time to tackle them head-on.
Don’t be daunted; it’s a process that requires a strategic approach.
Here’s a four-step guide to help you address these moisture sources effectively:
- Identify the Problem Areas: Start by scrutinizing the areas where you discovered moisture.
It might be a leaking pipe, a damp basement, or faulty gutters.
Understanding the problem area will help you devise an appropriate solution.
- Seek Professional Help: If you’re dealing with a significant issue like a roof leak or a cracked foundation, don’t hesitate to call in professionals.
They’ll have the expertise and tools to fix the problem efficiently.
- Implement Home Improvements: Minor issues, like condensation on windows, can often be resolved with simple home improvements.
Insulating your home, using dehumidifiers, or improving ventilation can make a big difference.
- Regular Maintenance: Prevent future problems by sticking to a maintenance schedule.
Regularly check your pipes, gutters, and roofing for any signs of damage.
So, you’ve now got the tools to spot moisture troubles in your home. This quick and easy aluminum foil test helps you identify high humidity or leaks. Remember, catching moisture issues early is key to preventing costly damage. Don’t ignore those signs. Act immediately to fix identified issues, and take preventive measures to keep your home dry. Let’s make your space a healthy, moisture-free environment. You’ve got this!

Giulio and Jennifer Bevilacqua are the dedicated and passionate owners of Highlander Waterproofing, a trusted name in basement waterproofing and foundation repair. With a commitment to protecting homes and ensuring the safety and well-being of families, Giulio and Jennifer have built Highlander Waterproofing into a premier service provider in the region. Their hands-on approach, combined with years of industry expertise, has helped them earn a stellar reputation for delivering reliable and effective waterproofing solutions.
The Bevilacquas pride themselves on offering personalized service, using proven techniques, and employing a team of highly trained professionals who share their dedication to quality workmanship. As a family-owned and operated business, Giulio and Jennifer emphasize integrity, transparency, and a genuine concern for their clients’ needs. They believe in building lasting relationships with their customers by ensuring each project is completed to the highest standards. Highlander Waterproofing continues to thrive under their leadership, offering innovative solutions and exceptional customer service that homeowners can depend on.
