


Have you ever thought about the importance of having a waterproof basement? It’s not just about preventing water damage. It’s about safeguarding your home’s structural integrity, protecting your possessions, and even improving your health by preventing mold growth. Let’s talk about how you can waterproof your basement from the inside, starting with identifying the sources of moisture, selecting the right waterproofing materials, and finally, maintaining a dry basement. But, what if you’ve got cracks or leaks? What kind of drainage system would work best for you? Stay tuned to find out.
Key Takeaways
- Identify indoor and outdoor moisture sources, using a humidity meter for accurate readings.
- Choose waterproofing materials like membranes, barriers, and sealants suitable for your basement conditions.
- Prepare your basement by ensuring ventilation, inspecting foundation, and addressing any water intrusion issues.
- Apply interior sealants evenly on clean, dry surfaces, using silicone-based, acrylic, or polyurethane sealants as needed.
- Install an effective drainage system, like a sump pump or French drain, and maintain it regularly for moisture management.
Identifying Moisture Sources
Before you start your waterproofing project, it’s vital to identify moisture sources in your basement. This isn’t just a matter of spotting water leaks, but also understanding the condensation causes that could be contributing to dampness.
Begin by checking for water leaks, which could be coming from either inside or outside your home. Inside, look around your pipes, washing machines, and water heaters for any signs of dripping or pooling water.
Outside, pay attention to your gutters and downspouts. If they’re not properly directing water away from your home, it could be seeping into your basement.
Condensation causes are trickier to pinpoint, but just as important to address. High humidity levels and temperature fluctuations can lead to condensation, which may appear as wet spots on your walls or floors.
Invest in a good humidity meter to monitor your basement’s humidity levels.
Selecting Waterproofing Materials
Choosing the right waterproofing materials is a crucial step in protecting your basement from moisture damage. You’ll need to consider several factors before making your choice.
- Waterproofing Membranes: These are applied to your basement walls and floor. They act as a barrier, preventing water from seeping through. You’ll need to choose a type that’s compatible with your basement’s construction and the local climate.
- Moisture Barriers: These are used alongside waterproofing membranes for an extra layer of protection. They’re usually made of plastic or foil sheeting, and are especially recommended if your basement is below ground level.
- Other Materials: Besides waterproofing membranes and moisture barriers, you may also need additional materials like sealants, drainage mats, and insulating boards, depending on your basement’s specific needs.
Keep in mind that it’s not just about picking the highest quality materials. They also need to be suitable for your basement’s conditions.
Preparing Your Basement
Ready to start waterproofing? Before you get started, you’ll need to prepare your basement. This isn’t a step you should skip, so let’s get to it.
First, check out your basement ventilation. Good ventilation is crucial in a basement as it helps control the moisture levels. If you’ve got poor ventilation, you’re more likely to have mold and mildew problems. So, don’t underestimate the importance of good airflow down there.
If you’ve got windows, make sure they’re open regularly. If not, consider installing a basement ventilation system.
Next, it’s time for a foundation inspection. This isn’t just about looking for cracks or damage. It’s also about checking for signs of water intrusion.
If you’ve got water seeping in, you’ll need to find the source and fix it before you can start waterproofing. Look for dark spots or efflorescence on your walls – these are telltale signs of moisture issues.
Applying Interior Sealants
With your basement properly ventilated and your foundation thoroughly inspected, it’s time to move on to the next step – applying interior sealants. This process is crucial in waterproofing your basement from the inside.
Before you start, you need to know about the different interior sealant types and the right application techniques.
- Silicone-based Sealants: These are ideal for sealing cracks and gaps. They’re waterproof, flexible, and can withstand temperature changes. However, they’re not recommended for large areas.
- Acrylic Sealants: Acrylic sealants are water-based, easy to apply, and dry quickly. They’re perfect for larger areas but mightn’t be as durable as silicone-based sealants.
- Polyurethane Sealants: These are the most durable, capable of handling heavy water pressure. They’re perfect for basements with serious water issues.
Now, let’s look at application techniques. First, ensure the surface is clean and dry.
Apply the sealant evenly using a brush, roller, or sprayer, depending on the type of sealant and the size of the area. Always follow the manufacturer’s instructions for the best results.
With the right sealant and technique, you’re one step closer to a dry, waterproof basement.
Installing a Drainage System
Having successfully sealed your basement’s interior, the next crucial step involves installing a drainage system. This is critical to ensure any water that does get in, has a way out. You don’t want to end up with a swimming pool in your basement, do you?
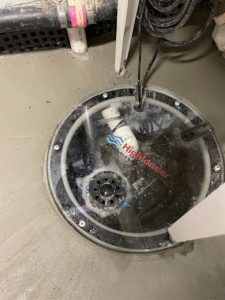
There are two main methods to achieve this: installing a sump pump or a French drain. Each has its own advantages, but both will keep your basement dry and free from moisture.
The sump pump is typically installed in the lowest part of your basement. It’s a device that pumps out water when it begins to fill up. You can think of it as your basement’s lifeguard, ready to rescue your possessions from a watery grave.
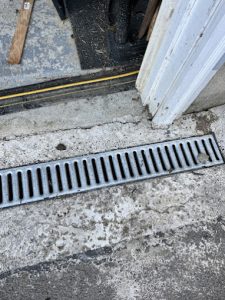
The French drain, on the other hand, is a slightly more complex system. It involves digging a trench around your basement’s perimeter, filling it with gravel and laying a drain pipe. This pipe carries water away from your basement, keeping it dry and safe from water damage.
Installation of these systems can be a bit daunting, but don’t worry. You’ve already conquered sealing your basement, and you’ll conquer this too.
Maintaining Your Dry Basement
Now that you’ve got a waterproofed basement and a functional drainage system, it’s crucial to keep things this way. The maintenance of your dry basement depends on a few key factors which include proper ventilation, humidity control, and regular inspections.
- Ventilation Methods: Ensure your basement is well-ventilated. This can be achieved through mechanical ventilation methods such as installing exhaust fans or vents.
These devices help to circulate air and reduce moisture levels.
- Humidity Control: Invest in a dehumidifier. These devices help control humidity levels and prevent the growth of mold and mildew.
Try to maintain a humidity level of 30-50% to keep your basement dry and comfortable.
- Regular Inspections: Make it a habit to inspect your basement regularly.
Look out for any signs of moisture or water leakage. Quick detection and repair can save you from costly damages down the line.
Frequently Asked Questions
What Is the Estimated Cost of Waterproofing a Basement From the Inside?
You’re wondering about the cost of waterproofing a basement from the inside.
This can vary greatly based on several cost factors. On average, you’re looking at a price range of $500 to $10,000.
The final cost depends on the size of your basement, the extent of the water issues, and the methods used for waterproofing.
It’s a sizeable investment, but it’s worth it to prevent damage and increase your home’s value.
How Long Does It Typically Take to Waterproof a Basement Internally?
It typically takes a pro about 1-2 days to waterproof your basement internally.
However, you must consider factors like the size of your space and the level of basement humidity. If it’s high, you’ll need more time for the interior drainage system installation.
Also, if there’re many cracks or leaks, it could extend the timeframe.
Can I Waterproof My Basement Myself or Should I Hire a Professional?
Sure, you can tackle DIY waterproofing if you’re handy and understand the process.
However, it’s often best to get a professional assessment first. They’ll identify any major issues you might miss. It might seem costly, but it’s worth it to prevent future damage.
If they suggest simple fixes, you could potentially handle those yourself. But for extensive problems, it’s safer and more efficient to let the pros handle it.
Are There Specific Seasons or Weather Conditions Ideal for Waterproofing a Basement?
Yes, there are ideal times for waterproofing your basement.
Spring, with its frequent rains, is best as it reveals leaks more clearly. Also, the winter thaw can expose cracks that let water seep in.
So, tackle this job post-winter or during spring.
However, don’t wait for these seasons if you’ve already noticed a problem. It’s crucial to address water leaks immediately to prevent further damage.
What Are the Potential Health Risks if I Fail to Waterproof My Basement Properly?
If you don’t waterproof your basement properly, you’re risking mold growth.
This not only damages your property, but also drastically reduces air quality. Long-term exposure to mold spores can lead to respiratory problems, allergic reactions, and even serious health issues like asthma.
It’s crucial to maintain a dry, well-sealed basement to prevent these problems and ensure your home remains a safe, healthy environment.
You’ve done it! You’ve identified your moisture sources, selected your materials, prepped your basement, applied those sealants, and installed a drainage system. Now, it’s all about maintenance. Keep an eye on your ventilation and humidity levels to ensure your basement stays dry. Remember, waterproofing is an investment in your home’s health and your peace of mind. With these steps, you’ve got a strong defense against future moisture issues. Well done!

Giulio and Jennifer Bevilacqua are the dedicated and passionate owners of Highlander Waterproofing, a trusted name in basement waterproofing and foundation repair. With a commitment to protecting homes and ensuring the safety and well-being of families, Giulio and Jennifer have built Highlander Waterproofing into a premier service provider in the region. Their hands-on approach, combined with years of industry expertise, has helped them earn a stellar reputation for delivering reliable and effective waterproofing solutions.
The Bevilacquas pride themselves on offering personalized service, using proven techniques, and employing a team of highly trained professionals who share their dedication to quality workmanship. As a family-owned and operated business, Giulio and Jennifer emphasize integrity, transparency, and a genuine concern for their clients’ needs. They believe in building lasting relationships with their customers by ensuring each project is completed to the highest standards. Highlander Waterproofing continues to thrive under their leadership, offering innovative solutions and exceptional customer service that homeowners can depend on.
